ML Lifecycle End-to-End
GenD 의 ML 라이프사이클은 4 Epic (#1081 Notebook ↔ Git / #1082 Model Serving / #1083 Batch / #1084 Streaming) + 6 follow-up 으로 M1 완성. 본 walkthrough 는 데이터 시드부터 추론 결과 조회까지 단일 시나리오 (신용평가 credit_risk) 로 7 단계를 따라간다.
각 단계에는 (a) UI 화면 또는 명령 (b) 검증 방법 (c) 다음 단계 의존을 명시.
시나리오: credit_risk 신용평가 모델
- 입력:
iceberg.silver.demo_customers(~10k rows,age,income,debt_ratio컬럼) - 모델:
sklearn.linear_model.LogisticRegression(분류 — 0/1) - 배포: KServe InferenceService (Issue #1111)
- 배치: Dagster asset 일 1회 01:00 UTC →
iceberg.gold.predictions_demo_credit_risk(Issue #1083 M1 데모 잡 표준명) - 스트리밍: Kafka
loan_applicationtopic → Bytewax → KServe →loan_decisionsink
사전 준비
운영자가 6 follow-up 의 manual 운영 작업을 완료해야 한다. 미완료 시 각 단계가 stuck.
| 의존 작업 | 가이드 | Issue |
|---|---|---|
| Gitea OIDC SealedSecret kubeseal 발급 | Gitea Operator Guide | #1109 |
| singleuser-codeserver ACR 첫 빌드 | (자동 — main 머지 후 GH Actions 실행) | #1110 |
| KServe controller helm install + cert-manager | Serving Install | #1111 |
| Redis (Feast online) + Bytewax ACR push + apply | Streaming Install | #1113 |
| ML Batch demo seed 주입 | ML Batch Seed Demo | #1112 |
단계 1 — 시드 데이터 적재 (Silver Layer)
iceberg.silver.demo_customers 테이블이 비어있다면 시드 SQL 실행. AKS prod 의 Trino 에 연결:
TRINO_POD=$(kubectl --context aks-genos-prod -n gend get pod \
  -l app.kubernetes.io/component=coordinator -o jsonpath='{.items[0].metadata.name}')

kubectl --context aks-genos-prod -n gend exec "$TRINO_POD" -- trino \
  --server http://localhost:8080 \
  --execute "
    CREATE TABLE IF NOT EXISTS iceberg.silver.demo_customers (
      customer_id VARCHAR,
      age INTEGER,
      income DOUBLE,
      debt_ratio DOUBLE,
      default_flag INTEGER
    );

    INSERT INTO iceberg.silver.demo_customers
      SELECT
        format('CUST-%05d', n) AS customer_id,
        CAST(20 + (RAND() * 50) AS INTEGER) AS age,
        20000 + RAND() * 130000 AS income,
        RAND() * 0.7 AS debt_ratio,
        IF(RAND() < 0.15, 1, 0) AS default_flag
      FROM UNNEST(SEQUENCE(1, 10000)) AS t(n);
  "
Layer 메타데이터는 Iceberg
extra_properties가 아니라 PostgreSQLtable_metadataregistry + Dagster assettags={"layer": ...}로 관리됩니다 (Issue #545,pipelines/gend_pipelines/assets/tpcds_to_iceberg.py참조). Trino 435 Iceberg 커넥터의 properties 화이트리스트가extra_properties를 거부합니다.
검증: SELECT count(*) FROM iceberg.silver.demo_customers; → 10000.
단계 2 — JupyterLab/VS Code 에서 모델 학습
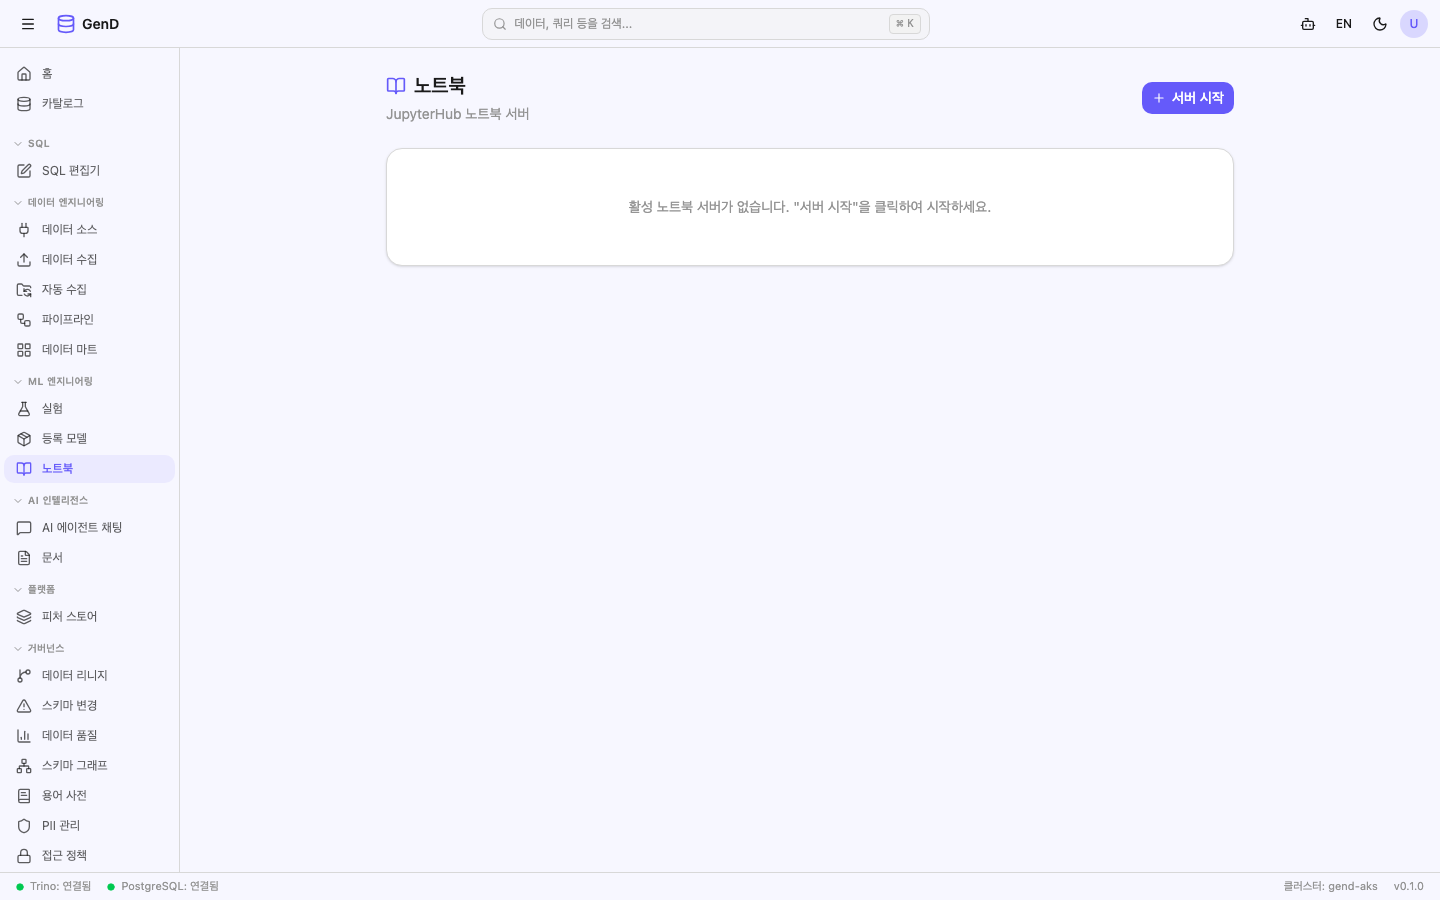
노트북 페이지 에서 서버 시작 → VS Code (code-server) profile 선택 → Gitea repo users/<your-username>/credit-risk-notebook clone (여기서 <your-username> = Keycloak preferred_username).
VS Code 내 새 train.ipynb 작성:
import mlflow
import mlflow.sklearn
import pandas as pd
import trino
from sklearn.linear_model import LogisticRegression
from sklearn.model_selection import train_test_split
from sklearn.metrics import accuracy_score, roc_auc_score

import os

# 1. Silver 에서 학습 데이터 fetch (gend-api 가 Trino JWT 자동 발급)
#    user 는 자신의 Keycloak preferred_username (= JupyterHub `$JUPYTERHUB_USER`)
#    또는 OS 사용자명. 하드코딩 금지 — 다중 사용자 환경에서 audit 추적 정확도가
#    이름 정합에 의존한다.
conn = trino.dbapi.connect(
    host="trino", port=8080,
    user=os.environ.get("JUPYTERHUB_USER") or os.environ.get("USER", "notebook-user"),
    catalog="iceberg", schema="silver",
)
df = pd.read_sql("SELECT * FROM demo_customers LIMIT 10000", conn)

# 2. 학습
X = df[["age", "income", "debt_ratio"]]
y = df["default_flag"]
Xt, Xv, yt, yv = train_test_split(X, y, test_size=0.2, random_state=42)
model = LogisticRegression(max_iter=1000).fit(Xt, yt)

# 3. MLflow tracking + Registry 등록
mlflow.set_experiment("credit_risk")
with mlflow.start_run(run_name="logreg-v1") as run:
    mlflow.log_metric("accuracy", accuracy_score(yv, model.predict(Xv)))
    mlflow.log_metric("roc_auc", roc_auc_score(yv, model.predict_proba(Xv)[:, 1]))
    info = mlflow.sklearn.log_model(
        sk_model=model,
        artifact_path="model",
        registered_model_name="credit_risk",
        input_example=Xt.iloc[:1],
    )
    print(f"registered: {info.model_uri}")
VS Code 안에서 git add train.ipynb && git commit -m "feat: credit risk v1" && git push 실행 → Gitea 가 #1108 webhook 으로 MLflow run 에 mlflow.source.git.commit tag 자동 기록.
단계 3 — MLflow Registry alias Production 부착
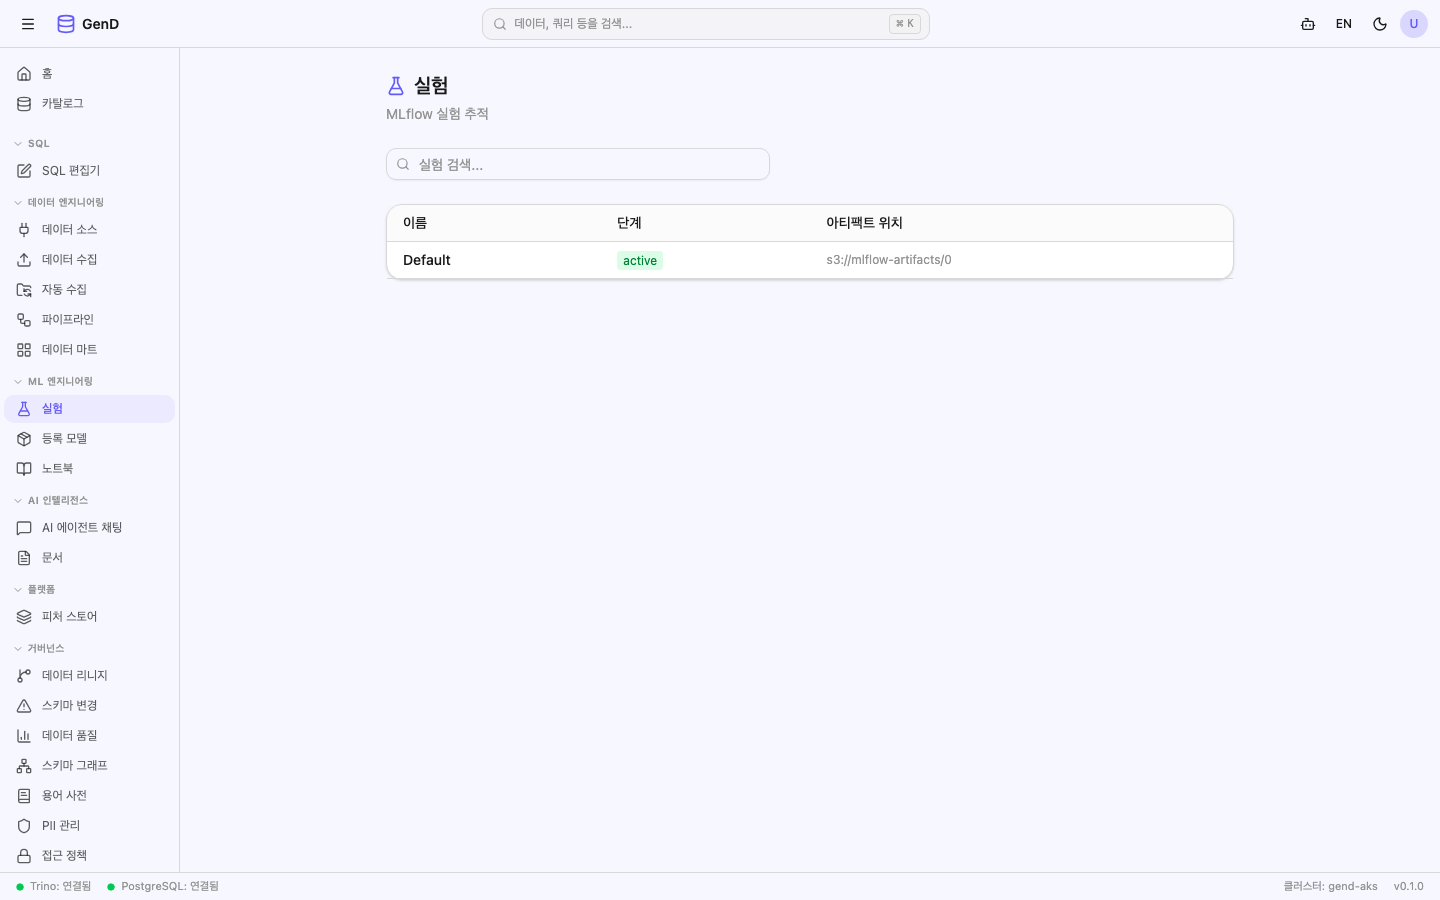
GenD UI 의 ML 허브 → 실험 스테이지 (https://gend.genon.ai/ml-hub/experiments — 구 /models/experiments 와 /ml-hub/develop?tab=experiments 는 자동 리다이렉트) 에서 credit_risk experiment → 최신 run 확인. 원본 MLflow UI 가 필요하면 https://gend.genon.ai/mlflow/ (Path 라우팅) 로 직접 접속.
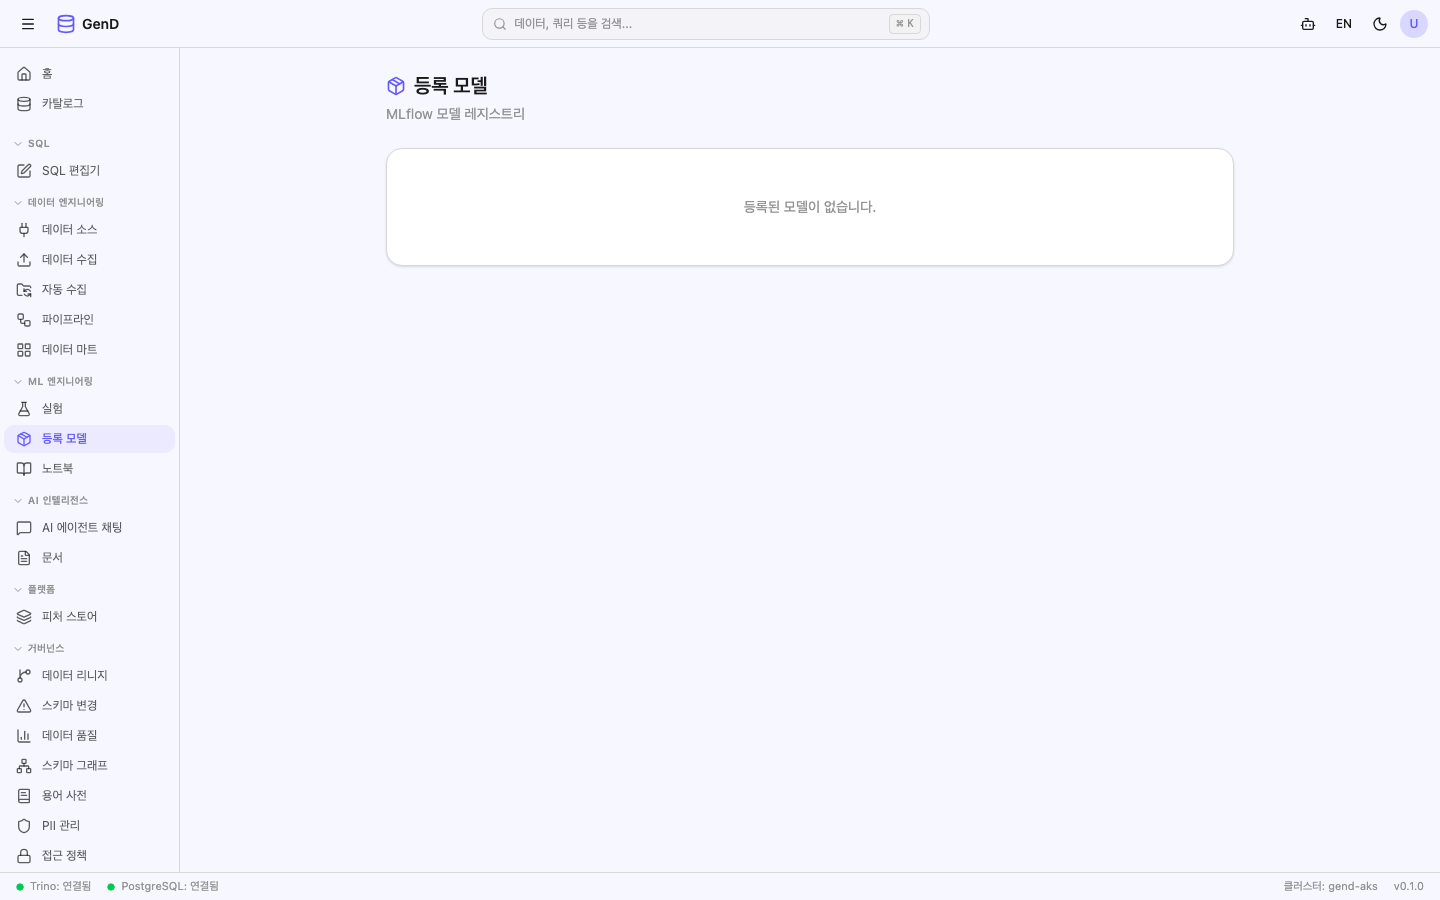
GenD UI 의 ML 허브 → 모델 스테이지 (등록 모델) (https://gend.genon.ai/ml-hub/models?tab=registered — 구 /models/registered 는 이 탭으로 자동 리다이렉트) 에서 credit_risk → version 1 → alias 추가:
docs 사이트의 페이지(예:
/data-platform/ml-batch/overview) 와 GenD 운영 UI 의 라우트(/ml-hub/develop등) 는 호스트가 다릅니다. 본 walkthrough 의gend.genon.ai/...경로는 운영 환경 UI 의 실제 라우트입니다 (ML 개별 메뉴 시절의/models/*구 경로는 모두/ml-hub/*스테이지로 리다이렉트).
MLflow CLI:
mlflow models set-alias --model-name credit_risk --alias Production --version 1
⚠️ alias-only 정책 (#1083 M1) — stage='Production' 사용 금지. 회귀 가드 test_no_mlflow_stage_hardcoding 가 코드 grep.
단계 4 — KServe 실시간 추론 endpoint 배포
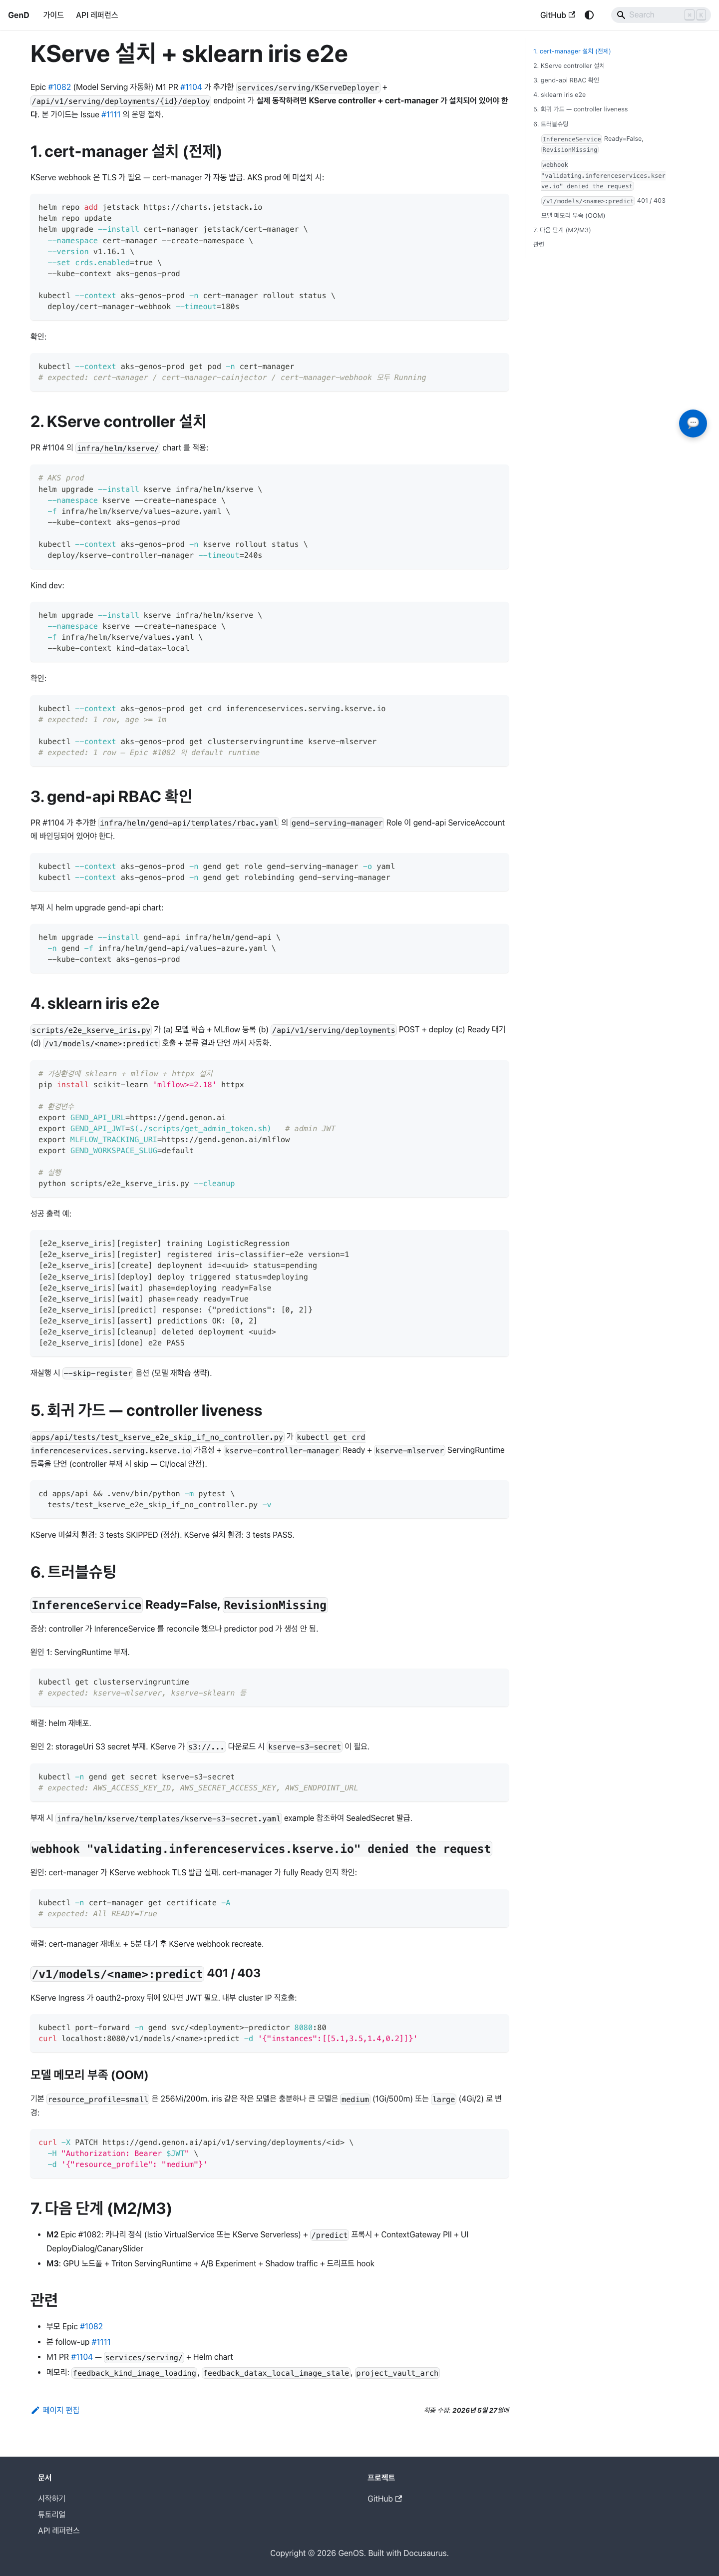
Serving Install 가이드 의 cert-manager + helm install 완료 후, scripts/e2e_kserve_iris.py 를 credit_risk 로 변형:
export GEND_API_URL=https://gend.genon.ai
export GEND_API_JWT=$(./scripts/get_admin_token.sh)

# 1) Create deployment row — 응답 본문에 id (UUID) 가 포함되므로 그대로 캡처.
#    /deployments GET 은 endpoint_name query 를 지원하지 않으며 (limit/offset 만),
#    개별 조회는 path param 인 GET /deployments/{endpoint_name} 입니다.
DEP_ID=$(curl -sX POST "$GEND_API_URL/api/v1/serving/deployments" \
  -H "Authorization: Bearer $GEND_API_JWT" \
  -H "Content-Type: application/json" \
  -d '{
    "endpoint_name": "credit-risk",
    "model_name": "credit_risk",
    "model_version": "1",
    "serving_runtime": "kserve-mlserver",
    "resource_profile": "small",
    "workspace_slug": "default"
  }' | jq -r '.id')

# (조회만 필요한 경우 — endpoint_name 으로 path 조회)
# curl -sH "Authorization: Bearer $GEND_API_JWT" \
#   "$GEND_API_URL/api/v1/serving/deployments/credit-risk" | jq

# 2) Apply InferenceService (id 기반 경로)
curl -X POST "$GEND_API_URL/api/v1/serving/deployments/$DEP_ID/deploy" \
  -H "Authorization: Bearer $GEND_API_JWT"

# 2-3분 대기 후 inference
curl -X POST "http://credit-risk-predictor.gend.svc/v1/models/credit_risk:predict" \
  -H "Content-Type: application/json" \
  -d '{"instances": [[35, 75000, 0.32]]}'
# expected: {"predictions": [0]}  (default 안 함)
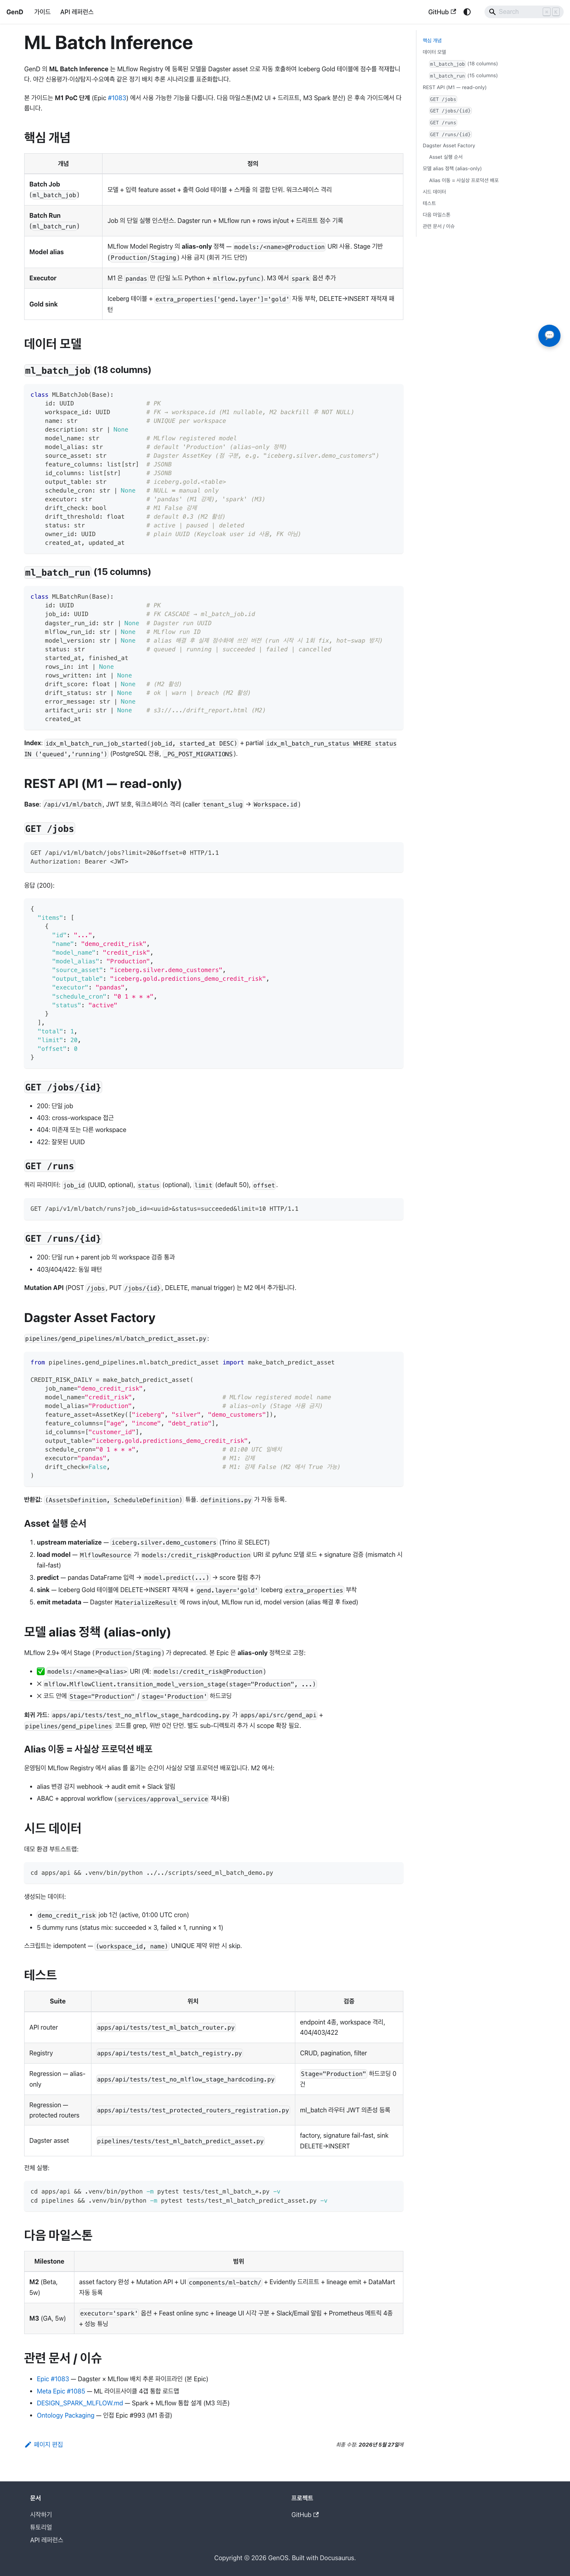
단계 5 — Batch Job 등록 (일 1회 Gold 적재)
ML Batch Overview 의 시드 스크립트 + asset factory 활용. M2 의 UI Mutation API 가 도착 전까지는 코드에서 asset 정의:
# pipelines/gend_pipelines/ml/credit_risk.py
from gend_pipelines.ml.batch_predict_asset import make_batch_predict_asset

# make_batch_predict_asset 시그니처 (M1, keyword-only):
#   name, source_table, feature_columns, id_columns, output_table,
#   model_name=None, model_alias="Production",
#   schedule_cron=None, executor="pandas", drift_check=False
# 반환: BatchPredictArtifacts(asset_def, job_def, schedule)
CREDIT_RISK = make_batch_predict_asset(
    name="demo_credit_risk",                          # 자산명 = bare identifier
    source_table="iceberg.silver.demo_customers",
    feature_columns=["age", "income", "debt_ratio"],
    id_columns=["customer_id"],
    output_table="iceberg.gold.predictions_demo_credit_risk",
    model_name="credit_risk",
    model_alias="Production",
    schedule_cron="0 1 * * *",
    executor="pandas",                                # M1 은 pandas only
    drift_check=False,                                # M1 강제 False, M2 에서 True
)
definitions.py 에 CREDIT_RISK.asset_def / CREDIT_RISK.job_def / CREDIT_RISK.schedule 을 등록 후 Dagster UI (gend.genon.ai/dagster/) 의 schedule 페이지에서 ml_batch_demo_credit_risk_schedule 활성화. (M1 데모 잡은 build_demo_batch_predict() 가 definitions.py 에 이미 등록되어 있어 본 단계는 다른 모델 을 추가할 때의 패턴 예시입니다.)
검증:
curl -H "Authorization: Bearer $TOKEN" \
  "https://gend.genon.ai/api/v1/ml/batch/jobs" \
  | jq '.items[] | select(.name == "demo_credit_risk")'

# 다음날 01:30 UTC 이후:
curl -H "Authorization: Bearer $TOKEN" \
  "https://gend.genon.ai/api/v1/ml/batch/runs?job_id=<id>" \
  | jq '.items[0] | {status, rows_in, rows_written, mlflow_run_id}'
# expected: status=succeeded, rows_in=10000, rows_written=10000
단계 6 — 스트리밍 추론 (Kafka → KServe → sink)
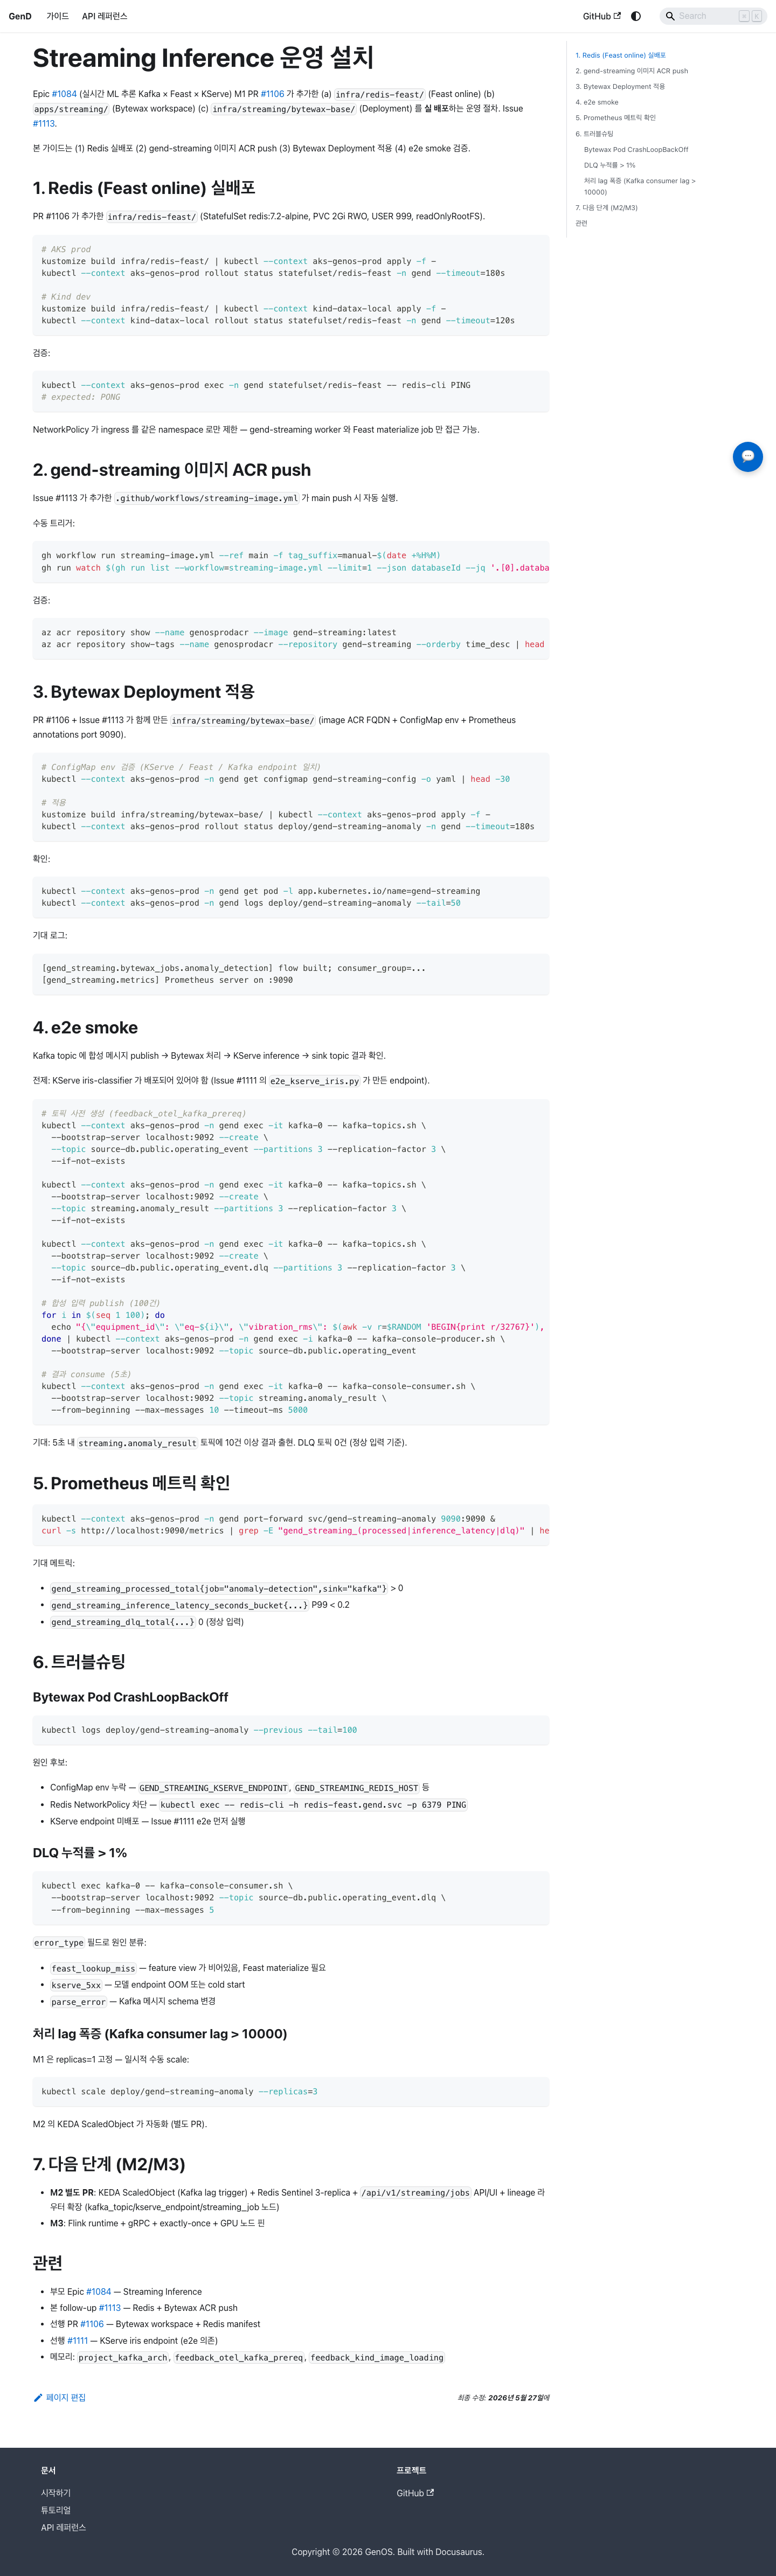
Streaming Install 의 Redis + Bytewax 적용 후, loan_application topic 에 publish → Bytewax 가 KServe /v1/models/credit_risk:predict 호출 → 결과를 loan_decision topic 에 publish.
# Topics 생성 (사전 — feedback_otel_kafka_prereq)
KAFKA=kafka-0
for T in loan_application loan_decision loan_application.dlq; do
  kubectl --context aks-genos-prod -n gend exec -it $KAFKA -- \
    kafka-topics.sh --bootstrap-server localhost:9092 --create \
    --topic $T --partitions 3 --replication-factor 3 --if-not-exists
done

# 합성 입력 1건
echo '{"customer_id":"CUST-99999","age":40,"income":85000,"debt_ratio":0.25}' | \
  kubectl --context aks-genos-prod -n gend exec -i $KAFKA -- \
  kafka-console-producer.sh --bootstrap-server localhost:9092 --topic loan_application

# 결과 consume
kubectl --context aks-genos-prod -n gend exec -it $KAFKA -- \
  kafka-console-consumer.sh --bootstrap-server localhost:9092 \
  --topic loan_decision --from-beginning --max-messages 1 --timeout-ms 5000
# expected: {"customer_id": "CUST-99999", "prediction": 0, "served_by": "credit_risk@Production"}
단계 7 — 결과 조회 (SQL 편집기 + AI Chat)
SQL 편집기 (gend.genon.ai/sql) 에서:
-- 배치 결과 (Gold sink 컬럼: id_columns + prediction DOUBLE + ml_batch_run_id + predicted_at)
SELECT customer_id, prediction, predicted_at
FROM iceberg.gold.predictions_demo_credit_risk
WHERE date(predicted_at) = current_date - INTERVAL '1' DAY
ORDER BY prediction DESC LIMIT 100;

-- 스트리밍 결과는 Kafka → 별도 sink (M2 에서 Iceberg Gold 자동 적재 hook 추가 예정)
AI Chat (gend.genon.ai/ai/chat) 에서 자연어 질의:
"demo_credit_risk 모델의 어제 배치 결과 중 default 위험 (prediction > 0.7) 상위 100명을 보여줘"
→ AI 가 NL2SQL → 위 쿼리 자동 생성 → 결과 표시. 모델 메타데이터 (alias, version, git commit) 도 RAG 컨텍스트로 포함.
검증 체크리스트
- Silver
demo_customerscount = 10000 - MLflow
credit_riskexperiment + run 1 + accuracy/roc_auc 메트릭 - MLflow Registry
credit_risk@Productionalias version=1 - Notebook commit SHA = MLflow run
mlflow.source.git.committag - KServe
credit-risk-predictorPod Ready +/v1/models/credit_risk:predict200 -
ml_batch_job.demo_credit_riskrow + 1+ml_batch_runsucceeded -
iceberg.gold.predictions_demo_credit_riskcount > 0 + Dagster assettags={"layer":"gold"}(Icebergextra_properties미사용 — Issue #545) -
loan_decisionKafka topic 에 합성 입력 1건의 prediction 결과 출현 -
loan_application.dlqtopic = 0 (정상 입력) - SQL 편집기에서 Gold 테이블 조회 성공
- AI Chat NL2SQL 결과 + 모델 메타 포함
트러블슈팅 인덱스
| 증상 | 가이드 |
|---|---|
노트북 import mlflow → ModuleNotFoundError: No module named 'mlflow' | 이미지에 mlflow(트래킹 서버 정합 버전, 현재 3.15.1) 사전 설치됨(#2392) — mlflow 포함 버전으로 재빌드/재스폰 필요. 임시 우회 %pip install mlflow==3.15.1 |
git push 인증 실패 (Gitea) | Git Operator — PAT 발급 절차 |
KServe Pod RevisionMissing / cert-manager | Serving Install §6 |
| Batch Job 실행 안 됨 (Dagster schedule STOPPED) | ML Batch Overview — schedule activate |
| Bytewax CrashLoopBackOff | Streaming Install §6 |
| MLflow alias 변경했는데 배치가 옛 버전 사용 | M2 영역 — alias 변경 webhook 부재. M1 은 asset 재실행 (즉시 새 alias 해결) |
M2/M3 예고
- M2 Mutation API (Job CRUD/manual trigger) + UI (
/ml-batch,/serving/deployments,/streaming/jobs) + Evidently 드리프트 + alias 변경 webhook + KEDA streaming autoscale - M3 Spark batch executor + GPU/Triton + A/B 트래픽 + Flink streaming + exactly-once + Feast online sync
관련
- 4 Epic: #1081 #1082 #1083 #1084
- 6 follow-up: #1108 #1109 #1110 #1111 #1112 #1113
- Meta Epic #1085
- ML Batch Overview
- Notebook Git
- Serving Install
- Streaming Install
- Seed Demo
- Git Operator